(continued from Placing an Order via the Internet)
This section describes the procedures and data fields on the OO administration page used to define may of the parameters needed to process on line orders. The data you provide ASI will be used in data fields. Most of the fields will be setup by ASI or your RM reseller (dealer). However, you should posses some basic knowledge of the information provided in this section so you can make changes when business requirements demand it. Example: you decide to expand your delivery range and need to change the zip code range. In this case you can login into your unique OO Admin page and adjust the zip code range. Perhaps you are expanding your hours of operation and need to change the information of your OO web menu page. You can make this change yourself by going into the Operating Hours Entry field .
The information needed to access your OO Administration page will be provided by ASI after your dealer submits your OO purchase to ASI. Please retain this information for your records. The information provided will be used to connect to the Admin page, passwords to limit access, and links to be placed on your website to access the OO portal. The information you will be sent is as follows:
The Admin page contains the data fields used to define the behavior and information displayed on the OO Portal. To make changes to the OO Portal you must access the Admin page using the link sent to you by ASI. You must use the user name and password provided by ASI to enter the site to access the Admin page.
Use the following steps to logon to the Online Ordering Administration Server v.17:
Once on the Admin Page you can proceed to one of the setup forms listed below:
The Chain Setup Form contains the entry fields for site address, phone numbers; email address, policy statements etc. Click on the Chain Setup option on the default Admin page to access the form. The Chain setup form is divided into four sections:
The following lists and defines the purpose of each filed in the Edit Chain Info section of the Chain Setup Form. When you are finished with your changes in is important you save your changes by:

Chain ID – Initially setup by ASI. This will be numeric value and cannot be changed by user. You will not use.
Chain Name – Initially setup by ASI and cannot be changed by user.
Single Menu – This should be enabled by ASI if the chain uses same menu for all locations. This information cannot be changed by user.
Web ID – Web identifier for the chain. Initially setup by ASI and cannot be changed by user. Used later in Web_UpLoad_Set-Up, in the field called “Chain Connection ID”.
Picture – Use this to upload the logo/banner for your chain, and if you choose Mercury or YesPay, an image for each credit card logo, (displayed on the start page of the OO Portal) The banner picture is displayed across the top of each page. Recommended dimensions are 800 by 125 pixels or smaller, 72 dpi. There is a maximum file size limit of 500KB. The images are limited to GIF files, but can contain animation. If you have any questions, please contact design@actionsystems.com

Chain address/contact information – Information as you want it to appear on the online ordering page.
Phone Number – Enter the number you wish customers to call if they have questions (HQ number is this is a chain or multi-unit account. (You can enter phone numbers for individual stores/restaurants in a different screen)
ZIP Code- Enter the restaurant zip code in this field.
Order Time Inc- The number in this field allows the customer to choose the ready time (on the OO customer portal information field). The increments available are: fifteen minute, on the half hour, or on the hour.
LogIn TimeOut- Enter the time you will allow the customer to stay logged into to the OO customer portal before logging out.
E-Mail – Enter the email address for the restaurant.
Allow Phone Login – Select this box if you want the customers to register with their phone number, as opposed to their e-mail address. Leave unchecked if you want the customers to register with their email address.
Main Color – Set by ASI. Do not modify.
Log In Timeout- Enter the number of minutes you want the browser to timeout after no activity.
Home Page URL – Enter the address of the restaurant’s web site.
PH Format – Uploaded from RM BackOffice System Configuration. To change the format- go to RM Back Office > Setup > Station Configuration > Cust/ Freq Diner > Phone # Defaults. You will have to change both the Format, Custom Format, and Minimum Number of Digits field settings if implementing a custom format. This change will only have to be done on the Master Station unless the system is using another station to process online orders.

Reseller E-Mail – Entered by ASI at Set-Up
Privacy Policy – Make any changes to the standard or “boilerplate” that is included.
Return Policy – Make any changes to the standard or “boilerplate” that is included.
There are places for the restaurant’s NAME, E-Mail Address, & Phone Number in this section.
Terms & Conditions – Make any changes to the standard or “boilerplate” that is included.
There are places for the restaurant’s NAME, E-Mail Address, & Phone Number in this section.
For a SAMPLE copy of Privacy Policy, Return Policy, and Terms & Conditions, go to: http://www.actionsystems.com/downloads/jerry/privacy policy.doc
The Order Type is typically defined as the method of product deliverance. By default, Restaurant Manager has three order types: Delivery, Carry Out, and Dine In. However, Restaurant Manager understands your establishment may use different terminology when it comes to describe order types. As example, instead of Carry Out, you store may use the term “Take-away” or “Pickup”.
Use the field boxes associated with each default order type to enter a new name if so desired. Make sure you press “Save” when finished. The changes made here will appear throughout the admin UI page as well the Web UI pages.

Add and/or edit the call center operators when using the Call Center Mode. Call Center Mode is where operators, instead of the customer, enter the orders and then route them to the appropriate restaurant. Add an operator by :
This topic will be discussed in later in the section: Placing orders via Call center .
IMPORTANT: Press the SAVE button to save your changes!
The Restaurant Setup Form contains the data fields for store specific data for information relating to addresses, stores name and telephone numbers. This form is used for both single or multiple restaurants belong to a chain. In addition, this form contains fields relating to discounts, delivery minimums, and various information sections displayed on the OO Portal.
To access this form, click RESTAURANTS on the default Admin page. It should have a minimum of one store on the list. Click the SELECT button. To change the restaurant name or edit any of the other parameters found on this form.
The Restaurant Setup Form is broken down into eight sections:
The illustration below is a sample screen shot with some of the fields already populated.
Restaurant ID: Number generated by the ASI to uniquely identify the restaurant. Shown for informational purposes only and cannot be edited.
Name, phone, and address information: Fill out as appropriate.
Delivery Info: Enter information pertaining to your delivery service that you wish your customers to see before they enter a delivery order.
Menu: Select the menu you wish to use for this restaurant. Note that this is only applicable if you use more than one menu in your chain. This option is grayed out if there is only one store in the chain.
Restaurant Web ID: Enter a unique name for this restaurant. Note what you entered. You will need to enter this exact same name in the Web Upload set up.
Prep Time: This is uploaded from the RMWIN BackOffice database of the restaurant.
You will need to offset the time to allow for food preparation. EXAMPLE: If it takes 25 minutes to prepare an order and the customer orders food for a 4:30pm take out, the system will print the order 25 minutes before (4:05pm) if this setting is set to 25. This cannot be changed from this ADMIN page
If the customer then orders a meal from the website and selects “immediately” the customer will see a warning like this:

Pizza Upload: Check this option if you want to upload the pizza menu that you’ve set up from RMWIN Back Office. (SET-UP --> MENU --> PIZZAS)
Time Zone: You may disregard this; the time zone is pulled from the restaurant’s RM Server
Delivery Charge:Amount to add to the price on an order to cover delivery service. This is uploaded from RMWIN Back Office. It cannot be changed here. This is set up as a tip from RMWIN BackOffice Module.
Min. Del. Amt. (Minimum Delivery Amount): Enter the dollar amount (if applicable) that is required to accept a delivery order.
NOTE: If the customer who is ordering a meal clicks FINISH & PAY, and they have not met the Minimum Delivery Amount, they will be offered a choice as shown below:
If the customer selects ORDER MORE, the screen returns to the order page, if they select PAY MINIMUM ORDER CHARGE, the dollar value shown (Difference between their order, and the amount programmed in the Min. Del. Amt.) is added to their virtual guest check. See below.
MinOrder Charge Refno (Minimum Order Charge Reference Number):This is uploaded from RMWIN Back Office. It cannot be changed here. This is required if you use the MINIMUM DELIVERY AMOUNT option, as RM needs a place to “dump” the dollar amount (which is random) into. You will need to set this number up in RMWIN Back Office. Simply choose a menu item, name it something similar, and note it down, as you will need it when you UPLOAD the RMWIN dBase. (You should notchoose this menu item to be a “web item” when building it in RMWINBackOffice)
MinOrder Charge Item Discountable:This is uploaded from RMWIN BackOffice. When building this menu item (see paragraph above) under the Price Options tab in the Menu Setup form of the RM BackOffice Module, chose whether or not you want the Minimum Order Charge to be discountable when discounting the web order (if applicable).
Discount:You may apply a discount exclusive to Online Ordering. This is uploaded from RMWIN Back Office. If no discount appears in the drop-down box, (and it won’t when you are first setting up the restaurant here in the ADMIN pages) you will need to add an “Online Discount” (if applicable) from RM BackOffice Module. (SET UP > SETTLEMENT AND TIPS > DISCOUNTS). Additional information on setting up discounts can be found under the section: Discounts for On Line Use.
Toppings Pricing:This is a text field for explaining the pizza pricing. It will show up on the web as shown below:
Disallow Immediate: If you want to allow customers to place orders for immediate pick-up or delivery, leave this field unchecked. To prohibit orders being placed for immediate pick-up or delivery, then check this box.
Disallow Today: If you want to allow customers to place orders for a time later in the day, leave this field unchecked. To prohibit orders being placed for later in the day pick-up or delivery, then check this box.
Disallow “Future Date”: If you want to allow customers to place orders for future days, either pick-up or delivery, leave this field unchecked. To prohibit orders being placed for future days, either pick-up or delivery, then check this box.
Google Maps: This option comes enabled by default. You may disable Google Maps by removing the check mark for the field setting.
Quantity Width: The number of digits allowed in the quantity box of the order entry screen. See screen shot below:
Operating Hours Description: This TEXT field is for entering descriptive times and other information about the restaurant.
Special Offers: This TEXT field is for entering any promotions the restaurant offers.
Menu Schedules: Disregard this field setting. Price schedules are performed in the RM BackOffice.
NOTE: Remember to press SAVE! Shows up on web as seen below:
Enter a single or multiple zip codes if you wish to enforce a delivery area. The maximum postal code digit length to be entered in the US is five and ten for the UK. The following are examples of how to enter postal codes:
Note: spaces are not required after the comma when separating postal codes and are supported if present. Dashes are used to designate a range and should not be used in nine digit postal codes in the United States.
You may also enter zip code ranges using wild card characters (on builds v.17.0.0.16 or later). The wildcards supported are "*" matching any number of alphanumeric characters and "?" matching single alphanumeric character. Example
To better illustrate zip code ranges using wild cards we will type the following in the "Allowed Zip Range" field:
2090?, 12?45, T3L*
By doing so we would expect the following behavior:
Note that OO does not mind the case (lower or upper)... e.g., zip code T3LAbCd can be entered t3labcd
OO picks up Suggested Tip Percentages as set up from RM BackOffice Module->Setup->Settlement and Tips.
The Operating Hours configuration gives you full flexibility for programming the allowed times customers can enter orders according to the type of order: Carry Out, Delivery or Dine in. You can add as many operating time periods as necessary to accommodate practically any opening times scenario.
NOTE: You must specify valid operating times for the restaurant! If you don’t, the OO link that ASI sent you for the restaurant won’t even load.

To setup a new time range, click the “ADD” button and enter the following:
Restaurant provides Carry Out service 7 days a week from 11am to 9pm, Delivery Service only on Saturdays and Sundays from 5 to 9pm. Closed on New Year’s Day.
To implement the above you need to create 4 time periods:
Period 1: Carry Out Service Hours
Name = Carry Out Service Hours
From/To = 11am to 9pm
Day of Week = EVERY DAY
Allowed Order Types checked = Carry Out only
Period 2: Delivery Service Hours (Saturday)
Name = Delivery Service Hours-Saturday
From/To = 5pm to 9pm
Day of Week = Saturday
Allowed Order Types checked = Delivery only
Period 3: Delivery Service Hours (Sunday)
Name = Delivery Service Hours-Sunday
From/To = 5pm to 9pm
Day of Week = Sunday
Allowed Order Types checked = Delivery only
Period 4: New Years Day (Closed)
Name = New Years Day-Closed
From/To = 12 am to 12 am
Day of Week = Override Date (set date to January 1)
Enable “Closed” option
Allowed Order Types checked = none
EXAMPLE: “Other Holidays” –Different Date Each Year (Closed)
Name = “Name of Holiday”Closed
From/To = 12 am to 12 am
Day of Week = Override Date (set date actual holiday you will be closed)
Enable “Closed” option
Allowed Order Types checked = none
NOTE: You must specify at least one set of valid operating times for the restaurant!
In this section, you configure the allowed forms of payment for the different services (Delivery, Take Out, Dine In) you might offer. For example: you can enforce prepayment via credit card for Take Out orders, and allow payment upon delivery for delivery orders (you would select PAY AT RESTAURANT in this example). You can also define your own forms of payments by clicking on the Add button.

If using PayPal, the merchant must first establish a PayPal account. Go to www.paypal.com, select the BUSINESS tab, select CREATE ACCOUNT button, select BUSINESS “Get Started” box, choose “Website Payments Standard” from the drop down box, and complete the PayPal process….
Then log into the PayPal account, and:
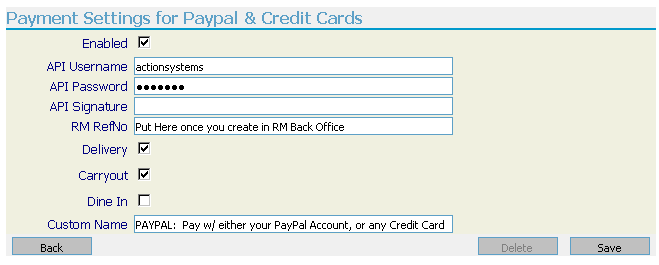
Now that you’ve set up your PayPal account, enter the following information in the PayPal/Credit Cards setup screen.
API Username:Information acquired from Paypal
API Password- Information acquired from Paypal
API Signature: Information acquired from Paypal
RM RefNo: corresponding form of payment ID in Restaurant Manager (not used of Stand Alone installations). This information is found under RMWIN->Setup->Settlement and Tips->Method of Payment. Enter the corresponding number found under the “#” column.
Delivery, Carryout, Dine In Enable the revenue centers you will accept Paypal Payments
Custom Name – Enter the name you wish the customer to see when they select this method of payment when completing their order on line. See below:

Establish a Mercury online ordering account. Also known as an “E-Commerce Account”.
Credit card accounts for online ordering must be separate from the restaurant’s “brick & mortar” credit card account.
When contacting MPS, at 800-846-4472, make sure to tell the MPS account rep this is for an “ASI Online Ordering Account”. Inform them that it is not for the customer’s web site, but for the Online Ordering Portal. Additionally, if the MPS rep asks, the account should “settle automatically” (2am or 3am in the morning).
For online CC payment, you have to create another form of payment in the RMWIN Back Office. (Suggest calling it “On Line Order) Note that the CC payment online is processed online, hence, the "CC Authorization" option in the RMWIN Back Office SHOULD NOT be checked for this particular payment form.
Enter the following information in the Credit Cards setup screen:

Enabled: Check this box to enable the payment.
Web Service URL: enter: https://w1.mercurypay.com/ws/ws.asmx
Merchant ID: Enter the Merchant ID of account (provided by Mercury). Include the “=” and following descriptive characters.
Merchant Password: Enter the Merchant password provided by Mercury.
Order Types: (Dine In, Delivery, Carry Out) Check proper box(s) if credit cards are allowed for the designated order type.
RM RefNo: corresponding form of payment ID from RMWIN BackOffice
(Not used with Stand Alone installations).
NOTE: The RM RefNo for Online Credit Cards should neverbe “3”. (The reason is that the Credit Card payment in O.O. should not require C.C. authorization (an option under the payment set-up form) Note that this option is enabled in RM RefNo # 3 because it is set (hard-coded) for VISA
Credit Cards Accepted: This text will appear on the front page of the Online Ordering portal, informing customers what cards the restaurant accepts.
CVV Field Required: Check this box if you wish to REQUIRE the customer to enter their credit cards cvv number (found on the back of MC/Visa and the front of AMEX cards).
CVV Match: Check this box if you wish to enforce a MATCH of the CVV number (recommended).
AVS Field Required: Check this box if you wish to REQUIRE the customer to enter their street address and zip code (recommended).
AVS Match: Check this box if you wish to enforce the MATCH of the AVS fields that the customer entered, to what is on file with the CC processor (recommended).
Custom Name: Enter what you want the customer to see, when they select their payment method. Suggest something like below:

The following are messages the end user will receive if credit card information is incorrectly entered:
Incorrect CC#- "Your payment couldn't be executed. Reason: Invalid Check Digit. Check Acct Number. Click here to reenter credit card information"
Card not accepted by Restaurant- This type of credit card is not accepted by merchant, please use alternate credit card
Credit Card Declined- "Your payment couldn't be executed. Reason: DECLINE.
Click here to reenter credit card information"
Incorrect CVV#- "Your payment couldn't be executed. Reason: CVV not matching.
Click here to reenter credit card information"
Incorrect AVV#- "Your payment couldn't be executed. Reason: Address or zip code not matching. Click here to reenter credit card information"
Incorrect Zip Code- "Your payment couldn't be executed. Reason: Address or zip code not matching. Click here to reenter credit card information"
YesPay is typically used in Europe / UK only.

Please follow these steps to setup YesPay for Online Ordering:
In case you encounter errors, access your Admin UI->Error Log. You need to click on the error # and look at the "INNER MESSAGE". You may search the knowledge base for the error that you see.
After a customer has entered an order online, it is sent to the location by using one or all of the routing methods below. Depending on the method used you will have more or less control and functionality.
If your system is integrated to Restaurant Manager POS (The most common scenario) select and enable the RM ADVANCE ORDER option. All orders are routed through the Advance Order module, and then converted to tabs or deliveries, based on the selections detailed below.
You MUST enable this mode, to print orders to the Restaurant’s printers. All online orders will be sent to Advanced Order first and the converted to either the Tabs or Delivery module.

Enabled: - check this box to enable the interface
RM Servers IP Address: Enter the IP address of the RM Server at the restaurant.
(Can use www.whatismyip.com, or www.ipchicken.com, to find out what the RM’s server IP is……)
EMP No / Password: - Enter the employee number that will be used to process orders at the restaurant. If necessary, create a “dummy” employee in RM BackOffice Module that will be associated with online orders. Very important: the employee defined here must be logged on at the restaurant for online orders to be processed.
DeliveryRevenueCenter: - Revenue Center # used at the restaurant to identify Online Delivery orders. This setting must be unique if you wish to distinguish between delivery orders initiated by phone and those initiated online.
Carry Out Revenue Center: - Revenue Center # used at the restaurant to identify Online Carry Out orders. This setting must be unique if you wish to distinguish between Carry Out orders initiated by phone and those initiated online.
Dine In RevenueCenter: - Revenue Center # used at the restaurant to identify Dine In orders. This setting must be unique if you wish to distinguish between Carry Out orders initiated by phone and those initiated online.
POS Sale Type: - Choose what POS Mode (Tabs or Delivery) an order is converted to. This should be set up for each order type.
Primary & Only If Primary Failed: - In order to alert the restaurant of an order that has not gone thru, you may if you wish select RM Advance Order to be designated as the “Primary” method of ordering. If this option is selected, and OO cannot for whatever reason pass the order to the restaurant, the “backup method” (if chosen) will be used, and an email will be sent to the ADMIN Email on file, notifying them of the failure. (See below)
Primary: Enabling this option means that the online order is voided if the RM Routing Mode fails. If OO cannot pass the order to the POS and this option is enabled, these 3 things happen:
Important: if Primary option is disabled with an enabled RM Routing Mode, and the RM Routing Mode failed, the online order is not voided if there is another routing mode that passed. For example, if the Email Routing mode is working, the online order is considered “successful” even if the RM Routing Mode failed
Only if primary failed- This option cannot be edited when the “primary option” is enabled. This cannot also be edited if there is not even a single mode that is set to primary. If you wish to enable this option in the RM Routing Mode (which is very unlikely), you’d only see the online orders in the POS when the primary mode failed.
If this interface is enabled, the order will be routed to an email address. Devices that can receive an email range from a standard desktop pc to a Blackberry or cell phone capable of receiving TXT messages
If you are only sending orders to an email account, it is strongly recommended that you use an email handling system that will generate some sort of audible alert when an email is received from the online ordering service. This will minimize missing orders.

Enabled: - check this box to enable the interface (this means an e-mail will be sent out with EVERY order, even thou it goes to POS also)
From: - Enter “rmweborder@actionsystems.com”
To: -email address where you want to receive the orders.
SMTP Server: - Enter “mailserver.actionsystems.com”
Primary / Only If Primary Failed: In order to alert the restaurant of an order that has not gone thru, you may if you wish select Email to be designated as the “Primary” method of ordering.
Primary: Enabling this option means that the online order is voided if the Email Routing Mode fails (even if the RM Routing Mode is working). If OO cannot pass the order via email and this option is enabled, these 3 things happen:

Important note: if Primary option is disabled with an enabled Email Routing Mode, and the Email Routing Mode failed, the online order is not voided if there is another routing mode that passed. For example, if the RM Routing mode is working, the online order is considered “successful” even if the Email Routing Mode failed.
Only if primary failed - This option cannot be edited if “primary option” is enabled. In addition, this cannot be edited if there is not even a single mode that is set to primary. If you wish to enable this option in the Email Routing Mode (which is the very likely case), you’d only receive the email when the primary mode failed.
Important note: if Only if primary failed option is disabled with an enabled Email Routing Mode, email is always received (as long as the Email Routing Mode is working) no matter if the primary mode fails or not. See Tip below.
TIP! If the settings are the following:
Owner would still get EVERY COPY of the order via email even if the RM Routing Mode has failed. This is how flexible OO is! Note though that the "order dump" email is only sent when the primary fails.
The advantage of having the email sent "only if primary fails" is that when owner receives such email, then he knows that the RM Routing Mode is failing. However, because many owners want to get an email of every order, you might suggest doing the "only if primary fails" with Fax Routing Mode (note though that this may not be needed if he receives the "order dump" email).
In the case of a fax interface you must place the fax machine at a location where someone can continuously monitor it so that orders are not missed. Alternatively you can enable the phone alert option, so that you receive a phone call every time an order is sent via this method. Note that it is your responsibility to contact the customer in case of a problem with the order, such as an out of stock situation or a delay in the order preparation. The faxed order contains all the information you need to contact the customer.
To: - In the US and Canada enter “XXX-XXX-XXXX@Myfax.com”, where <XXX> is the fax number where you wish to receive the orders. International phone number should not contain spaces or dashes. The fax must be in the format 1-area code-number (In US & Canada only- this does not apply to oversea numbers)
Primary / Only If Primary Failed: In order to alert the restaurant of an order that has not gone thru, you may if you wish select “Fax” to be designated as the “Primary” method of ordering.
Primary: Enabling this option means that the online order is voided if the Fax Routing Mode fails (even if the RM Routing Mode is working). If OO cannot pass the order via fax machine and this option is enabled, these 3 things happen:
- Customer sees an error from the WebUI, hence, he will not be thinking that his order went thru
- The payment made (e.g., credit card) is rolled back meaning customer will not be charged for failed order
- The Admin will received an email (usually called “order dump email”) detailing the reason for error and the order details of the failed order. The purpose of this email is to notify the Admin of the failure so he can correct it. Please see screen shot below to know where this Admin Email is to be set up.
Important Note- if primary option is disabled with an enabled Fax Routing Mode, and the Fax Routing Mode failed, the online order is not voided if there is another routing mode that passed. For example, if the Email Routing mode is working, the online order is considered “successful” even if the Fax Routing Mode failed
Only if primary failed- This option cannot be edited if “primary option” is enabled. This cannot also be edited if there is not even a single mode that is set to primary. If you wish to enable this option in the Fax Routing Mode, you’d only receive the fax when the primary mode failed.
Important note: if Only if primary failed option is “disabled” with an enabled Fax Routing Mode, fax should always be received (as long as the Fax Routing Mode is working) no matter if the primary mode fails or not.
NOTE ON FAXING: When the fax will be sent depends solely on Myfax.com. There is usually a short delay.
Menu (Groups Order & Menu Item Order as they appear online)
This information is uploaded from the RM BackOffice Module, and is here only for viewing the online menu. Menu Item Setup must be done from RM BackOffice Module (RMWIN->Menu Setup). See “Selecting Items to Sell Online” in the ” RM Back Office” section of this document for details on how to select and configure the items sold online.
However, you can change the order in which the menu groups and individual menu items appear on the on line pages regardless of how they are uploaded from the RM BackOffice module.

Use the following steps to change the order of how menu groups are arranged on the OO customer portal:


From here you can now reorder the way the groups will appear online.

Use the following steps to change the order of how menu items are arranged on the OO customer portal:
Repeat this process as many times as necessary, for each item. In most cases, it will not be necessary to use the ITEMS ORDER, as the items will display in the order entered in the Menu Setup (RM BackOffice Module). However, ITEMS REORDER gives the restaurateur additional flexibility.
NOTE On “Timing” of Web Updates:
It is advisable to try to limit any changes you make to your online ordering application during times when on line orders are NOT accepted. Though rare, there is the slight chance that while making changes on the web thru the ADMIN pages, while at the same time a customer is attempting to order, may result in an error. This does NOT apply to menu items being updated from RM Back Office, and then uploaded to the Web.
Pizza setup is typically done within the Pizza Matrix setup form located in the RM BackOffice Module. This information is uploaded from the RM BackOffice Module; any fields relating to Pizzas are only for viewing the online menu.
Colors on online ordering Portal
If your client wants the banners or separators on the Online Ordering Portal to be a different color, perhaps to more closely match their web site, please forward the color information to ASI.
This completes the ADMIN pages portion of the Online Ordering set up.
However, you will now need to go to the RM BackOffice Module on the local PC / Server onsite atthe restaurant, where the Online Orders will be printed, to complete theIntegrated Online Ordering set up.
You do not need to go into Accounts, Customers,Error Log, or Reports. These fields are more informational and have no fields relating to setup. However, additional setup may be required in the Coupons form.

The information below provides more detail about: Accounts, Customers, Error Log, and Reports.
In this area, you may set up several different administrators who can make changes to the Online Ordering account, thru the ADMIN pages. Effective September 29, 2008 there is only one level of security. Use “9” when entering the security level.

Click on the "Select" link on the admin's corresponding row to enter Administrator information:
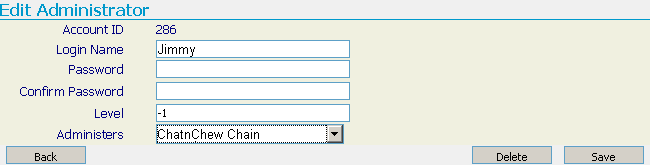
Remember to press "Save" when finished.
ASI’s Online Ordering captures the email address of every customer who orders, and those who log on, but don’t place an order. These addresses may be exported to third party email programs for marketing purposes, or to ASI’s E-Mail club.
Customers for all the restaurants in a chain are kept in the same database. This allows the Online Ordering System to be used in Call Center mode, where operators, instead of the customer, enter the orders and then route them to the appropriate restaurant.
Synchronizing Customer Databases
If your system allows processing takeout and delivery orders from the POS as well as from your web site then you have to periodically run a utility (synccust.exe) to synchronize the POS and Online customer databases so that they reflect the same customer information.
Email Merge From Online Ordering to ASI’s E-Mail Club
If the account is also set up with a corresponding email club, ASI can automatically merge all of the email addresses harvested from those clients who have signed up as online ordering customers, into the email club.
Before attempting to export the email addresses, you must have MS Excel loaded on the computer you are working from. From this Chain Admin screen do the following to export customers:
A warning that you need MS Excel will appear, click OK if you have MS Excel. SAVE or OPEN the file that is being created.
Once that file is OPENED in MS Excel, you may reformat per your individual needs.
See the Email Club User Manual, page 8, for details on formatting the file for IMPORT into ASI’s Email Club. Get the manual at: http://www.actionsystems.com/rmmailclub.pdf
Note: you can use the filters on the top of the Customers form to target specific customers. See the section on Report Filters for more information on the use on filters.
An alternative method to using discounts to drive business is the use of Coupons (fixed dollar discounts). The setup of the actual coupon is performed in the RM BackOffice Module in the Menu Setup form by creating a negative priced menu item. A more detailed coupon setup description can be found under the section: Dollar Discounts For Online Ordering.
Note: the process of setting up coupons is not the same as the regular Coupon functionality employed at the POS. You need to use a menu item for coupons.
Once the coupon (fixed dollar discount) has been uploaded to the admin site you can proceed to apply and enable the coupon by doing the following:
- CODE- the digits in the field can be alpha numeric (i.e. LZ1SH9). Keep in mind that the customer will have to know this code prior to entering the OO web page.
- COUPON AMOUNT- Where the price of the coupon is typically setup in the RM BackOffice; you can override the price in this field. However, changing the price of a coupon here will not be accurately reported in the RM BackOffice Module.
- MIN. CHECK AMOUNT- The min dollar amount before coupon can be applied.
- Active- activates or deactivates coupon to be used.

It should be noted that the above steps are only done on the initial setup. When new coupons are added, user only needs to define the menu items (under the pre-defined groups) then upload the menu and complete the Coupon setup from the Admin UI.
Further, when wanting to temporarily disable a coupon, the user only needs to deactivate it from the Admin UI->Coupons List. He may use the [Delete] function to delete the coupon from the Admin UI. Note though that if item is not deleted from the Menu Setup Form, it gets uploaded again the next time a menu upload is done.
The primary use of the error log is to assist ASI developers and tech support personnel in determining the reason an error occurred.
Various reports are available online, for review of the online orders. On Line reports allow you to view customers who have purchased items, registered but not purchased items, various sales reports, and miscellaneous reports covering Coupon Codes, Order Status, and Refunds. On line reports are meant to compliment the reports found in the RM Report Module where the bulk of reporting will be done.

On Line Reports allow you to track customers who have or have not made purchases. For this reason ON Line reports provides filters to help you better manage information. The filter section of the report form has three parts:
Once all fields have been completed, you must select the “Add Filter” button. Filters can be removed by selecting the “remove” button.
As example, we want to find when a customer registered for on line ordering. We happen to have the customer’s telephone number. We will use the “Customers” reports to find the information. In the illustration below, we used the phone number filter, used the “=” Conditional filter, and the entered the phone number for the customer“. We then pressed the “Add Filter” button and then selected the “Execute” button to run the report.
You can add a many filters as needed to refine you search. In our next example we want to run a report for customers who have registered but have not made a purchase so we can send coupons encouraging the customer to make a purchase. We will run the “Customers without Purchases” report; use the Name filter, “Contains” in the Conditional filter field, and type “Test” in the Data Entry field. The illustration below shows the results:
Perhaps we want to refine our search by address. To do this will add an additional filter using the Address filter, “Contains” in the Conditional filter field, and type “Test” in the Data Entry field. The illustration below shows the new results:
Note: Filters may vary depending on the report.
The sorting function for On Line Reports is particularly useful on reports with large amounts of data. For these types of reports you can use the “Sort” filter. This is a simple function only requiring you to click on the Sort By filter drop down menu, choose a filter from the list, and then select the “Add Column” button. The Add Column button simply adds the designated filter to the report.
As an example we want to know what our top selling pizzas are. We will run the By Group report found in the Sales section of the Online Reports. In the filter section we will use the Item Group filter and look for menu groups containing the “pizza’. Next, we will use the sorting filter the list the lowest to highest selling pizzas using the Income sorting filter. After pressing the Execute button to run the report we get the following result as pictured below.
Note: the Income filter will only sort from lowest to highest.
Once the filters are defined you must use the “Execute” button to run the report. Most reports are printed using your web browser print function.
The Order Status report deserves some special mention. This report tells us the status of pending orders. This report is particularly useful when a customer calls stating they have not received their order. You can use this report to verify the order was received and if the order was accepted. You can view the particular order detail information by using the “print” button on the order row.

(continued in Restaurant Manager Back Office Setup RM Back Office)